Pages

Showing posts with label pasta and polenta. Show all posts

Saturday, June 15, 2013

Beetroot Polenta Croquettes with Mango Ratatouille


It is time for another "leftovers" recipe. This time, I am using leftover beetroot polenta to make croquettes, and leftover roasted eggplant and capsicum to combine with mango and cherry tomatoes into a ratatouille.

Because of the nature of leftovers (it is what is left over from my meal, not necessarily yours!), I give you the recipes to make from scratch.

These are two separate recipes that combine extremely well together in an all vegetarian meal.

The recipe here is one that I vary with polenta and risotto, and of various flavors at that.


Beetroot Polenta Croquettes

For the polenta
medium beetroot bulb
1 clove of garlic, crushed and minced
2 cups (or as needed) vegetable stock (from organic cube is fine)
1 cup (organic) fine polenta
1/2 cup grated parmesan
salt/pepper to taste
Breading
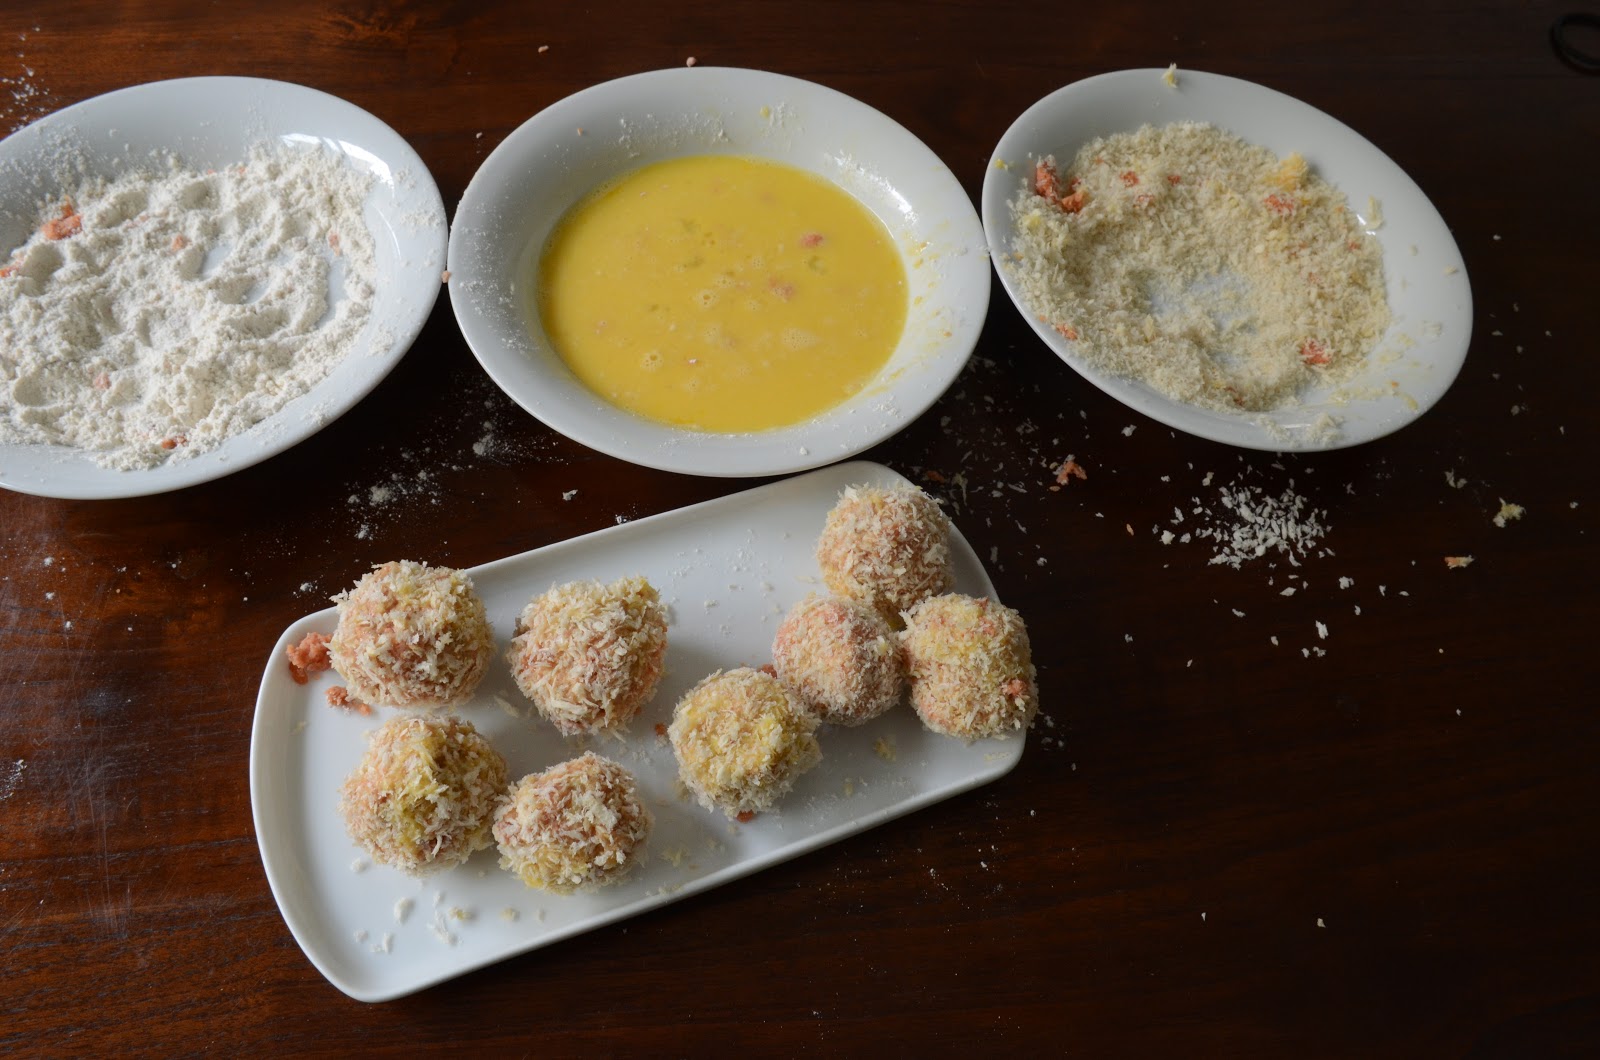
one (small) bowl each of flour, beaten egg and breadcrumbs
  • Grate the beetroot on a fine grater (it goes into the polenta: you do not want large chunks). 
  • Bring 2 cups of vegetable stock to boil, add the grated beetroot and garlic. Bring to a boil and simmer for about 20 minutes to cook the beet, and infuse all the flavors. 
  • Add the polenta, and stir well. It will thicken quickly, and depending on the quality polenta you use, you may need to leave it to bubble and frequently stir. If the polenta gets too thick, add more water (gradually) or milk for creaminess. You want a polenta that is firm enough to cut into squares and grill, or as in this recipe: roll into balls to bread and fry.
  • Taste polenta, adjust seasoning and add parmesan. Pour the cooked polenta into a tray to cool.
  • When cool enough to handle, roll into balls to be breaded.
  • set up your "breading station": the bowls of flour, beaten egg and breadcrumbs (I like to use Japanese Panko*, but you can use any breadcrumb you like. Or try breading with cornmeal, for instance!)
  • The polenta croquettes are now ready to deep fry: heat oil to 180C and fry the croquettes until golden and crisp (4-5 minutes)
*Panko are flaky, coarse Japanese breadcrumbs. Panko tends to soak up less oil and has a very light crunch.

Ratatouille of Roasted Eggplant, Red Pepper, Cherry Tomatoes and Mango
1 medium eggplant, diced
1 red capsicum diced (or roast whole, peel and seed, and then dice)
1 cup cherry tomatoes, halved
1 cup mango (one that is not too ripe), diced
1 small red onion, sliced
1 clove of garlic, crushed
1 tbsp olive oil
salt/pepper to taste

This is an all-oven roasted, dead easy recipe for ratatouille. I made mine with leftover eggplant and capsicum that was already roasted, so I merely sauteed the onion, added all other ingredients at once and warmed through for about 5-10 minutes on low heat.

If you roast all in the oven, you will have to watch timings: start with the eggplant, capsicum, and onion. There are many kinds of mango "out there", varying from sweet with hints of coconut, to sour and almost savory. I like a mango in this recipe that has a bit of acidity and is not overly sweet. However, the recipe works with whatever mango you like (or for that matter: is available). Use a mango that is not too ripe.
  • Preheat the oven to 200C
  • Season the eggplant and red pepper (if you are using from raw), mix with the sliced onion, toss with the olive oil and roast for 20 minutes, or until caramelizing and getting soft. 
  • For the last 5 minutes: add the garlic, cherry tomatoes, and mango for the last 5 minutes. Mix in carefully!
  • Season to taste
This recipe also featured in a previous post: Mango Mania (here).


Follow Life in the Food Lane on Facebook for updates on new posts and other adventures in the Food Lane.

Monday, December 17, 2012

Basil, Hazelnuts & Fresh Pasta


Ever since a recent trip to the Langhe (here) - that cradle of Slow Food, of barolo wines and white truffle - I have rekindled my love for another gourmet product from this region: hazelnut.

With its very own characteristic roundness, the hazelnut is a beautiful nut. Hazelnuts grow in husks, and when ripe, the hard-shelled seed falls out. The hazelnut is shelled, and eaten raw or roasted. Hazelnuts are rich in energy, dietary fiber and monounsaturated fatty acids, as well as an excellent source of minerals and vitamins, in particular vitamin E (the antioxidant). Nutrition aside, toasted hazelnuts are deliciously crunchy with a unique savory sweet flavor.

The worldwide popular hazelnut-chocolate paste Nutella was originally developed in Piedmont in the late 1940s. It was called Paste di Gianduja (gianduja itself a mixture of 70% chocolate and 30% hazelnut dating back  to Napoleonic times, when taxes on chocolate forced chocolate manufacturers (in Turin) to come up with a creative solution, and add (cheaper) hazelnuts to the mix in order to make chocolate). The Paste di Gianduja developed in Alba in 1948 by pattisier Ferrero, was renamed in 1963 by Ferrero's son to become the famous Nutella. It is around the same time (1962) that Ferrero made the first, now equally famous Ferrero Rocher.

Hope I did not whet your appetite for hazelnut cake or nutella ganache too much, because in this post crunchy, aromatic toasted hazelnuts enrich a basil pesto and liven up a tasty vegetarian main course.


This recipe was inspired by dish I tasted in a ristorante in Serralunga, not far from Alba (in Piedmont, Italy). It was a rainy day last October, and we'd spent it touring the winery of Oddero Winery. The smell of fermented must still on my nose, we had a fresh pappardelle with a sauce that seemed so simple, yet was so refined in aromas and flavors. It was a sauce of crunchy celery and carrot with fresh Pesto Genovese (the Ligurian coast is an hour's drive away) and richly garnished with toasted, locally harvested hazelnuts.

A Vegetarian Sauce of Basil Pesto, Vegetables and Hazelnut
(recipe for 3-4)

3-4 stalks celeri, diced small
2 medium to large carrots, diced small
150 gr button mushroom, diced fine
1 tbsp olive oil
handful hazelnut (brown skin removed and toasted), crushed coarse
1-2 tbsp homemade basil & hazelnut pesto (recipe below)
salt/pepper to taste

Heat the olive oil in a pan to medium hot. Add the mushroom, and sweat (= stirring occasionally, let them get soft) for 2-3 minutes. Add the remaining vegetables, and cook very briefly for another 2-3 minutes: heating in the olive oil releases their aromas, but you do want to keep their refreshing crunch. Now spoon through the basil & hazelnut pesto, taste and adjust seasoning. Toss with a pasta of your choice and garnish with crushed hazelnut. The best combination is with fresh pasta (recipe following).


Basil and Hazelnut Pesto
1 tightly packed cup of fresh basil leaves
2 cloves of garlic
1/2 cup grated parmesan
1 tbsp toasted hazelnut
olive oil

Using a large mortar and pestle, pound the basil leaves to a mash. While pounding, add the garlic, then the pine kernels, all the while drizzling in olive oil at intervals. It is a process of pounding, adding ingredients, smooth with olive oil, and over. When almost done (your "pesto" is a smooth paste), add the parmesan and carefully pound through. Taste and adjust seasoning.

Tip: if you quickly "shock" the basil leaves in boiling water, and immediately cool them in ice water before pounding, your pesto will be bright green.


Fresh Pasta
400 gr plain flour (sieved)
4 large eggs
a lot of arm muscle

Sieve the flour onto a clean work surface. Make a hole in the center and break the eggs one by one in the hole. Start to work the flour into the eggs (use a wooden spoon or your hands) until all egg is incorporated. It will be a very tough, crumbly dough at this point. Flex your arm muscles and start to knead: flatten it on the surface, shape into a round, flatten again. Stretch, pull, knead, and flatten. Over and over, for at least 8 minutes, or until your dough has gained elasticity. Wrap tightly in cling foil and leave for at least 30 minutes in the fridge.

Set up a pasta machine (unless you want to use even more arm muscle, and roll out dough using a rolling pin). Dust the roller of the pasta machine with a little flour. Divide the dough into small balls (size of a small orange), and dust with flour. One by one: roll pasta through the machine on a wide setting. Roll out, fold double, and do again. Repeat a few times until your dough appears easy to stretch without tearing, and is silky soft (4-5 times). When you're happy with the dough, start to roll it out through the machine again, this time decreasing the width each time until you reach a desired width.

Whenever the pasta dough appears to get even slightly sticky, dust with some flour.


To make pappardelle and other ribbon pasta
Dust the pasta sheets you made, roll up carefully, and cut into 1 inch-wide ribbons for papardelle. Slice thinner to make fettucini, or even thinner for spaghetti. Alternatively, fit the pasta machine attachment for desired pasta shapes. Dry on a kitchen cloth for about ten minutes, and roll into nests until ready to use (I keep mine wrapped in ziplock in the fridge (this being fresh (raw egg) pasta, I prefer to use it within 24 hours). Bring a large pot of water to a boil. When it boils, add a good pinch of (coarse) salt. Cook the pasta for 3-5 minutes, or until it is soft to bite.

There are many, many fresh pasta recipes available online. This fresh pasta recipe is based on the guidelines of Marcella Hazan as she explains them at length in Marcella Cucina (1997).


Follow Life in the Food Lane on Facebook for updates on new posts and other adventures in the Food Lane.