Pages

Showing posts with label vegetarian. Show all posts

Saturday, August 9, 2014

Golden Chanterelle Fricassee with Fleur d'Ail


Rain may not be super on your summer beach, but it is divine for the forest floor, opening up a lush mush bed for wild mushrooms. After a rainy week earlier this summer, the mushroom man at the local farmers market in the Quebec Laurentians had a happy heap of wild mushrooms. I came back with a paper bag full of golden chanterelles and lobster mushrooms. The natural yellow-gold and apricot of those mushrooms account for the vibrant hue of yellow in this mushroom fricassee.

Fleur d'ail
At the vegetable stall, same farmers market, I routinely bagged a bunch of fleur d'ail. I get it every summer. Crunchy to bite, delicately green, and mildly garlic-fragrant, fleur d'ail (as they are sold in Quebec) or garlic scapes are the budded stems from which the garlic bulb grows. Chopped fine I use it in just about anything: a remoulade dip, with steamed mussels, in a mustard-cream sauce for steak, in a fresh tomato salsa, tossed in with caramelized onions for an onion tart, as the "aglio" in the aglio-olio caprese pasta popular in our house, in a compound butter, to use for instance on escargots gratin, or even as a simple crisp and colorful garnish.

To humor a friend, who is trying to avoid using cream and butter, I am currently also exploring a no-butter-no-cream version of this wild mushroom fricassee. Stay tuned!

Golden Chanterelle Fricassee with Fleur d'Ail
recipe for 2 (main course) or 4 (appetizer)

250gr mixed lobster mushrooms and golden chanterelles (or other wild mushrooms)
2-3 garlic scapes, chopped in thin rounds
1 small to medium onion, sliced thin
1 small leek, sliced thin
1 clove of garlic, crushed
1 tsp Dijon mustard
1/2 cup heavy cream
1 tbsp olive oil
1 tbsp butter

Clean the mushrooms with paper towel gently. If they are all different size, break the bigger ones to equal the size of smaller mushrooms. I had a big lobster mushroom, which I divided into many smaller pieces.

Heat olive oil and butter, until butter is melted. Add the sliced onions and leek, and over low heat, saute them gently until soft (do not brown). Still over low heat, add the lobster mushrooms and garlic, cook for 2 minutes. Stir in mustard and add the heavy cream and fleur d'ail. Simmer gently for 1 minute, and finally add the chanterelles: gently "wiggle" the pan to let the tender mushrooms "sink" into the cream sauce rather than stir them in. Simmer gently for about 10 minutes. Serve immediately.

We had it as a main course, following a mixed green salad. We dipped crusty bread in the sauce, and ate the mushrooms with no interference of any other flavors.


fleur d'ail among good and golden greens
I love to cook with wild mushrooms, here sauteed with veal sweetbreads (recipe here)


Wednesday, March 26, 2014

Balqees Honey Pear Salad

This is a salad that marries the well-known combination of pear, nuts, and blue cheese with a hint of the Middle East, a touch of the Southern states, and a memory of liquid deliciousness: raw Yemeni saffron infused honey by Balqees (link).

When I moved from Dubai to Houston, one of my worries was that I would not be able to find the great flavors of the Middle East, from spices to condiments. And then I found Phoenicia. Founded by an Armenian couple in the 1970s, Phoenicia is as close to the Middle East as you can get in Houston. I happily started to browse through my Middle Eastern cookbooks again. One thing I haven't found is the prized raw Yemeni honey, which in Dubai you can find sold in big glass jars for you to taste, compare, and choose.

This salad vaguely evokes Arabic flavors in the rose water that lends an aromatic touch to the dish. The soft, mild blue cheese and the characteristic flavor of pecans bring it home to Texas (yep, still getting used to calling it "home"). You can make this salad with any honey, but it will never have that same depth of deliciousness or that velvety richness that comes with natural, raw honey. Saffron-infused at that. Below recipe is loosely based on Malouf's Honey-Roasted Pear And Walnut Salad (page 261 of his must-have cookbook New Middle Eastern Food).

Balqees Raw Honey Roasted Pears, Blue Cheese and Pecans

Recipe for 4
2 ripe pears
fresh lemon juice
1 tbsp butter
1/2 cup roasted pecans
150gr crumbled soft, mild blue cheese (I used an artisanal Vermont blue cheese)
1 tbsp Balqees Raw Yemeni Honey (saffron-infused if you have: an unforgettable taste)
1 splash of rosewater
100gr (or 2 cups full) of young leaf salad
a handful of fresh, small herb leaves (mint, thyme, basil, for instance)

Cut each pear (skin on) into six wedges, cut out the cores, and sprinkle with fresh lemon juice to prevent discoloring. Heat the butter in a skillet until melted. Add the pears and toss regularly over high heat for 1-2 minutes (make sure each side "gets a turn"). Add the honey and toss well to coat (it caramelizes quickly). Add the rosewater (steam will rise), and toss some more, always over high heat. When the pears are nicely coated and caramelized, take them out and keep warm.

In the same pan, toss the pecans over high heat. The residue of honey-butter-rosewater left in the pan will cling to the nuts. Sprinkle some coarse salt on and let cool (make sure to separate the individual nut pieces: once they cool, the honey will stick them together like glue).

Carefully mix all ingredients together and serve. Keep aside some of the blue cheese, 2 slices of pear, and some pecans to garnish the top.

A huge miss: a Balqees shop around MY corner, where I can go, taste that gorgeous honey, and decide on which jar to take home. From the renowned Sidr honey and infusions from wildflower to saffron, Balqees is paradise for a honey lover! In this photo toasted raisin-walnut bread, an artisanal goats cheese from Burgundy, and raw Yemeni Wildflower honey. You don't need much else!

Friday, March 14, 2014

Squash & Root Vegetable Casserole

Don't you just love the color and variety of root vegetables? From a deep purple potato to the warm orange rutabaga, dark red or golden yellow beetroot, warm white celeriac and parsnip. It is vegetable time!

This Squash & Root Vegetable Casserole is open to interpretation. In fact, so is the name: I've called variations of this dish "curry" and "tajine", depending on the spice mix I used, and pan I cooked it in. Choose your own favorite squash and root vegetables. I use acorn squash here, but made it before with butternut squash (my favorite squash, with its warm color, rich flavor and velvet texture). You can add coconut milk if you like.


Squash & Root Vegetable Casserole 
ingredients
6-7 different squash/root vegetables: I used 1/2 acorn squash, 2 parsnip roots, 1 medium yellow beetroot, 1/2 medium celeriac, 1 turnip, 1 rutabaga, all cut in relatively same size chunks.
1 medium onion, sliced in half moons
500 ml good stock (organic vegetable or chicken)
paste
4-5 cardamom pods
1/4 tsp of each: ground ginger, cumin, turmeric, white pepper
chili flakes to taste
3 garlic cloves
generous tbsp fresh lime juice
4 shallots
1 tbsp olive oil (+ 1 tbs oil for cooking)

  • In a mortar and pestle, pound the cardamom pods until fine (you can use the seeds only, but I usually don't bother separating, and leave the outside skin in).
  • add all the spices and garlic, and pound until forming a paste
  • add the lime juice, then add the olive oil
  • continue pounding carefully (don't splash) until all is mixed into a smooth, runny paste
  • heat a tablespoon olive oil over medium heat. Add the onions and saute for up to 5 minutes
  • add the root vegetables and stir to mix with onions. Let caramelize lightly, stirring regularly for up to 10 minutes
  • add the spice paste, stir well to coat all vegetables, and cook for 1-2 minutes (not too long, or it will become bitter)
  • add the stock, stir all together, and bring to a boil
  • over low heat, simmer for 20-30 minutes or until the hardest vegetable (in my curry that was the beetroot) is soft.

You can serve this as a main course with rice. I served it with a homemade salsa verde as well. Now, if your family is like mine, they will love it yet will also mutter how great this would be with grilled lamb chops!


you may also like my Many Vegetable Lasagna and In My Kitchen: Six Months After Leaving Dubai

Find me on Facebook
Find me on Twitter


Saturday, June 15, 2013

Beetroot Polenta Croquettes with Mango Ratatouille


It is time for another "leftovers" recipe. This time, I am using leftover beetroot polenta to make croquettes, and leftover roasted eggplant and capsicum to combine with mango and cherry tomatoes into a ratatouille.

Because of the nature of leftovers (it is what is left over from my meal, not necessarily yours!), I give you the recipes to make from scratch.

These are two separate recipes that combine extremely well together in an all vegetarian meal.

The recipe here is one that I vary with polenta and risotto, and of various flavors at that.


Beetroot Polenta Croquettes

For the polenta
medium beetroot bulb
1 clove of garlic, crushed and minced
2 cups (or as needed) vegetable stock (from organic cube is fine)
1 cup (organic) fine polenta
1/2 cup grated parmesan
salt/pepper to taste
Breading
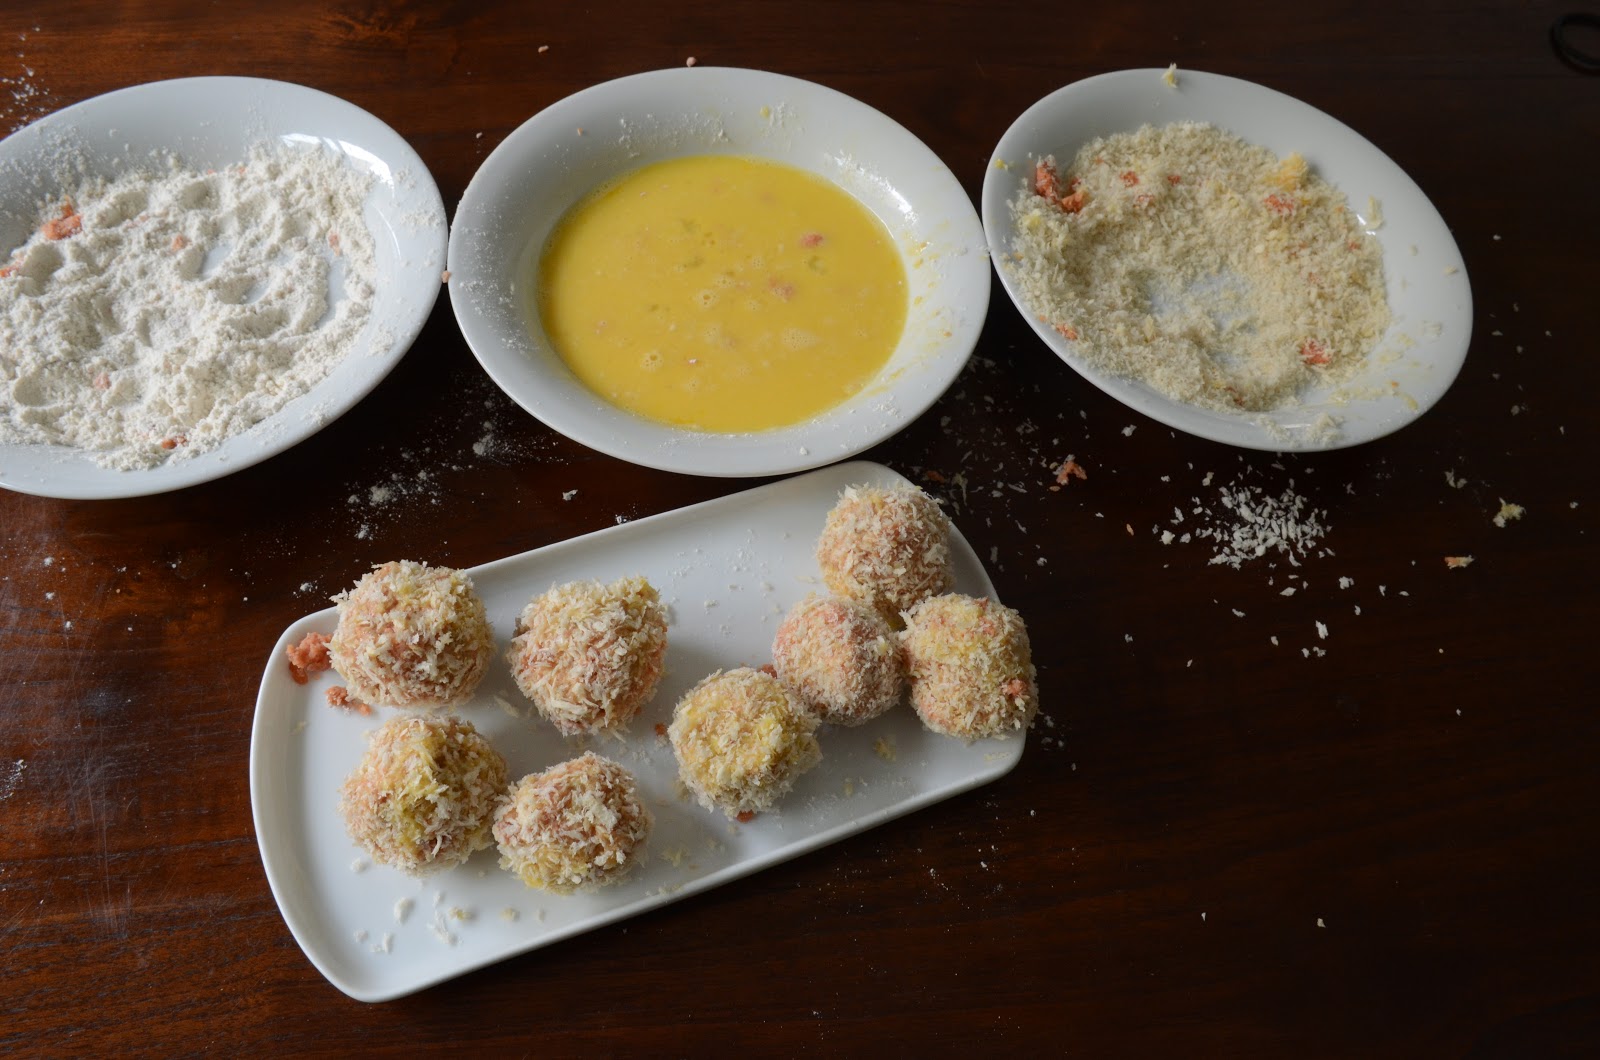
one (small) bowl each of flour, beaten egg and breadcrumbs
  • Grate the beetroot on a fine grater (it goes into the polenta: you do not want large chunks). 
  • Bring 2 cups of vegetable stock to boil, add the grated beetroot and garlic. Bring to a boil and simmer for about 20 minutes to cook the beet, and infuse all the flavors. 
  • Add the polenta, and stir well. It will thicken quickly, and depending on the quality polenta you use, you may need to leave it to bubble and frequently stir. If the polenta gets too thick, add more water (gradually) or milk for creaminess. You want a polenta that is firm enough to cut into squares and grill, or as in this recipe: roll into balls to bread and fry.
  • Taste polenta, adjust seasoning and add parmesan. Pour the cooked polenta into a tray to cool.
  • When cool enough to handle, roll into balls to be breaded.
  • set up your "breading station": the bowls of flour, beaten egg and breadcrumbs (I like to use Japanese Panko*, but you can use any breadcrumb you like. Or try breading with cornmeal, for instance!)
  • The polenta croquettes are now ready to deep fry: heat oil to 180C and fry the croquettes until golden and crisp (4-5 minutes)
*Panko are flaky, coarse Japanese breadcrumbs. Panko tends to soak up less oil and has a very light crunch.

Ratatouille of Roasted Eggplant, Red Pepper, Cherry Tomatoes and Mango
1 medium eggplant, diced
1 red capsicum diced (or roast whole, peel and seed, and then dice)
1 cup cherry tomatoes, halved
1 cup mango (one that is not too ripe), diced
1 small red onion, sliced
1 clove of garlic, crushed
1 tbsp olive oil
salt/pepper to taste

This is an all-oven roasted, dead easy recipe for ratatouille. I made mine with leftover eggplant and capsicum that was already roasted, so I merely sauteed the onion, added all other ingredients at once and warmed through for about 5-10 minutes on low heat.

If you roast all in the oven, you will have to watch timings: start with the eggplant, capsicum, and onion. There are many kinds of mango "out there", varying from sweet with hints of coconut, to sour and almost savory. I like a mango in this recipe that has a bit of acidity and is not overly sweet. However, the recipe works with whatever mango you like (or for that matter: is available). Use a mango that is not too ripe.
  • Preheat the oven to 200C
  • Season the eggplant and red pepper (if you are using from raw), mix with the sliced onion, toss with the olive oil and roast for 20 minutes, or until caramelizing and getting soft. 
  • For the last 5 minutes: add the garlic, cherry tomatoes, and mango for the last 5 minutes. Mix in carefully!
  • Season to taste
This recipe also featured in a previous post: Mango Mania (here).


Follow Life in the Food Lane on Facebook for updates on new posts and other adventures in the Food Lane.

Tuesday, April 23, 2013

Mango Mania: Soup, Ratatouille and Upside Down Cake


“Langras from Benares, for those who liked their mangoes tart; dussebris from Lucknow for those who liked them sweet and smooth; and chusnis, small sucking mangoes for those who preferred not to eat the fruit at all but to suck the juice straight from the skin.” (from: Climbing the Mango Trees by Madhur Jaffrey)

Flaming red to pale green, the mango is a fascinating fruit. It can be oblique oval, round as an apple, flat oblong, or shaped like a kidney. It can be big as a football, or small as a duck’s egg. Mango is a stone fruit, revered for its juicy, buttery soft flesh. It has a unique aroma that lingers between peach and pineapple, with a hint of citrus.
Color is not always an indication that a mango is ripe. A ripe mango smells “ready to eat” (smell it around the stem). It has a sweet fragrance, and feels soft under the skin. An overripe mango bruises easily, and smells cloyingly sweet. You can buy unripe mangoes, and leave them at room temperature to ripen. As for fibrous mango: the flatter ones (and flesh closer to the stone) can be very stringy. In that case, hold the mango over a container and “strip-squeeze” the pulp off.

This time of year (in Dubai) sees an abundance of fresh mango flown in from India and beyond. It is an abundance that brought on a mango mania in my kitchen. Below are three recipes with mango. Enjoy!
curried carrot and mango soup, served chilled
A Three Course Mango Meal

Curried Carrot and Mango Soup 
(makes 1 liter)
2 large carrot, diced (makes about 2 full cups)
1 medium sized mango, just ripe (you want a tart, not too sweet mango), diced
1 small/medium red onion, diced
1 tbsp curry powder (use your own favorite)
1 tbsp vegetable oil
3 cups (approx) vegetable stock 
1 cup coconut milk (coconut milk + stock is about 1 liter)
the juice of 1 small lime (to taste if your mango is sweet, leave out if you use a sour mango)
salt/pepper to taste
crème fraiche (optional)
fresh koriander (optional)
  • Heat the oil. Add onions and fry gently over low heat until soft. 
  • Add the carrots, stir well and leave to cook for about 10 minutes, stirring occasionally. 
  • When the carrots have softened (and a little caramelised), add spice mix and stir.
  • Mix coconut milk and stock together and add 3/4 of it to the carrots (keeping 1/4 to add at the end if needed). Simmer for 20 minutes.
  • When the carrots are really soft (you can squash them easily with a fork), add the diced mango and simmer for another 5 minutes. 
  • Add the lime juice (if the soup is on the sweet side). Puree until smooth with a (hand-held) blender, adding the remaining stock as needed. Taste, and garnish with crème fraiche and koriander.
  • Serve hot or cold.
curried carrot soup served hot with koriander and a dollop of creme fraiche

    Ratatouille of Roasted Eggplant, Cherry Tomatoes, Red Pepper and Mango 
    (4 side portions)
    1 medium to large buttery sweet mango, diced
    1 large eggplant, diced
    1 red pepper (capsicum), cleaned and diced
    1 cup cherry tomatoes, halved
    1 medium onion, sliced
    2 cloves garlic, crushed and minced
    pinch cayenne pepper
    pinch cumin
    pinch paprika powder (preferably smoked)
    salt/pepper to taste
    • Preheat the oven to 200C. 
    • Toss the eggplant, onion, and red pepper with a little olive oil, the spices and some salt in an oven tray.
    • Roast in the hot oven for 20 -30 minutes, tossing 2-3 times. 
    • The vegetables are ready when they are starting to char a little, and have softened. 
    • Add the diced mango, mix in gently. Do the same with the cherry tomatoes. Roast for another 3-5 minutes (depending on how "roasted" you want the tomatoes to be).
    • Serve as a side dish with roast chicken, quail or duck for instance. Or with grilled fish. It makes an excellent vegetarian salad tossed with quinoa, and even better served with grilled halloumi.
    mango ratatouille with quinoa and roasted quail
    Raspberry and Mango Medley Upside Down Cake

    top
    50 gr unsalted butter
    100 gr raw cane sugar
    2 cups ripe various mango, cut into chunks*
    1 cup raspberries
    note: adjust the amounts of raspberry and mango to your own liking
    batter
    100 gr soft unsalted butter
    125 gr granulated sugar
    1 tsp vanilla extract
    pinch of salt
    1 tsp finely grated lemon peel
    2 large eggs
    200 gr self-raising flour, sifted
    ¼ cup milk (approx)

    *choose a selection of different mangoes for this cake if you can. In this one, I used badami, Alphonso, and long Kenya mango. It makes for variation in color and taste.

    Cake pan choice:
    You can choose the diameter of your cake pan depending on the kind of cake you want. A 20 cm diameter will  give you a taller cake with a thicker fruit top (it will also need longer in the oven at a slightly lower temperature (175C). In a cake pan of 25cm diameter, your cake will be more of a pie (flatter), be more sticky (the caramel has more surface to bubble into the batter).
    • Preheat the oven to 190C (175C if using a 20 cm cake pan). 
    • Melt the butter in the cake pan. Add the sugar and melt until dissolved. Let the caramel cool. Divide mango and raspberry over the caramel in a regular pattern.
    • Beat butter and sugar together until smooth and pale. Add vanilla extract and grated lemon peel. Add eggs one by one, plus vanilla extract and salt. 
    • Add half of the sifted flour and gently mix in. Add the rest of the flour . Add enough milk for a smooth, spreadable batter. 
    • Spread carefully over the arranged fruit. 
    • Bake in the oven for 30-40 minutes (slightly longer for 20 cm cake pan). Check after 30 minutes with a toothpick: if it comes out clean, the cake is done. If still wet, continue to bake and check every 10 minutes.
    • Let the cake cool for about 20 minutes, then turn over on a plate (careful, caramel is still hot)
    25 cm cake pan raspberry and mango medley upside down cake
    20 cm cake pan upside down mango cake

    • The Mangifera Indica is native to South Asia, where it was first cultivated over 4000 years ago. Legend tells that a mango grove was planted for the Buddha to find a shady place to rest. Fossil evidence found in India indicates that the mango tree already existed 25-30 million years ago.
    • Mango is a powerful antioxidant and an excellent source of Vitamins A, B, and C, minerals, and dietary fiber.
    • an extensive list of mango cultivars is found on Wikipedia (here)
    • Each year at the end of June, the International Mango Festival in Delhi is a 2-day festival where you can sample over 1100 mango varieties. 
    • Climbing the Mango Trees by Madhur Jaffrey is a memoir of storytelling and childhood memories of her family life growing up in India, with the common thread of food weaving through the book. I loved it.
    Follow Life in the Food Lane on Facebook for updates on new posts and other adventures in the Food Lane.

    Saturday, March 2, 2013

    Pea & Okra Barley Risotto with Fried Porcini


    This barley risotto is all vegetarian, and has garden peas, okra, and parmesan cheese. I comes topped with fried porcini, which you could easily replace with a mushroom to your liking (or availability) or if you don't like mushrooms: try it with grilled halloumi, for instance. For the carnivorous, I attach a link at the bottom of this post for braised lamb shanks that would go wonderful with this barley risotto instead of the porcini.

    Culinary Trivia
    Pearl Barley is a chewy grain with a nutty, hearty flavor. It is a wholesome grain, even if it has been polished (to which it owes it's name: pearl). Polished barley is still very rich in dietary fiber.

    Okra is a pod vegetable also known as lady finger. Highly nutritious and loaded with dietary fiber, minerals and vitamins, it has a very distinctive-hate-it-or-love it characteristic: it is slimy. It is why okra can be used as a thickener, as it is in a thick, spicy soup served over rice called gumbo. Okra in this risotto has the same effect: it thickens and thus binds stock and barley grains, giving the barley risotto a little more depth of flavor in the process. I tell you, even if you're not a fan of okra because of its sliminess, you will like it in this risotto, where the sliminess "dissolves" into a creaminess you would associate with a classic risotto.

    I use dried porcini - somehow, this mushroom packs deeper, almost meaty flavors dried than it does fresh. I use some of the rehydration water to add to the stock used to make the barley risotto.

    Leftovers
    I use pea and okra here, which you could easily substitute for whatever leftover vegetables you have. If the vegetables are too big, just cut them up. And if they are cooked already, add them last minute. I have made this barley risotto with sauteed mushrooms, with leftover fresh tomato and basil sauce, with grilled eggplant, with sauteed zucchini.


    Pea and Okra Barley Risotto with Fried Porcini
    (recipe for 3-4)

    about one cup dried porcini, rehydrated
    1 cup pearl barley, rinsed
    1 cup cleaned fresh garden peas
    1 cup okra
    1/2 small preserved lemon (if you have no preserved lemon: use a tsp grated fresh lemon peel)
    1 medium onion, chopped fine
    2 garlic cloves, crushed and minced
    1 tbsp (or to taste) grated parmesan
    salt/pepper to taste
    hearty (vegetable) stock (about a liter), add a tbsp of the porcini soaking water
    1 tbsp olive oil
    • rehydrate the porcini: place in a bowl and cover with hot to boiling water. Leave to stand for about 5 minutes, or until the mushrooms are soft. Drain and pat dry. Use some of the liquid to add to the stock!
    • bring the stock to a boil and keep on a very low simmer.
    • Heat the olive oil in a casserole over medium heat. Add the onions and sweat for 3-4 minutes, or until translucent. Add the garlic and the pearl barley, toss in the onions and add a cup of stock.
    • Simmer gently so the barley can soak up all the liquid. When the liquid has gone dry, add another cup of hot stock. 
    • After about 20 minutes cooking time, taste the barley, cut the okra in small rings and add to the barley. Stir and continue to add stock whenever the liquid has gone dry, and repeat this process until the barley is soft to eat : it will still have a chewy bite, but is pleasant to eat. It takes about 30-40 minutes, from the first cup of hot stock you add.
    • In the last 5 minutes of cooking the barley, add the garden peas. They do not need long to cook. Finish the risotto to taste with the preserved lemon (skin only, discard the pulp), salt/pepper to taste, and grated parmesan.
    • pat the rehydrated porcini dry, and heat a tbsp olive oil in a frying pan. Add the porcini (cut into smaller pieces if you prefer) and fry crisp in 1-2 minutes. 
    • spoon the barley risotto onto plates, and top with the fried porcini. To taste, grate some more parmesan over the dish, and serve.
    • ps. you can precook the barley for about 10 minutes, drain and then proceed. It will speed up the process (in a way: you will have another dirty pan and colander...)


    This barley risotto is also excellent as a side for braised lamb shanks. In this case, leave off the porcini mushrooms. Of course you could add porcini as well, but it will be an overload of flavors.

    Recipe for braised lamb shanks (click)

    these fork-tender lamb shanks combine well with the nutty and refreshing tastes of pea and okra barley risotto
    Follow Life in the Food Lane on Facebook for updates on new posts and other adventures in the Food Lane.


    Monday, December 17, 2012

    Basil, Hazelnuts & Fresh Pasta


    Ever since a recent trip to the Langhe (here) - that cradle of Slow Food, of barolo wines and white truffle - I have rekindled my love for another gourmet product from this region: hazelnut.

    With its very own characteristic roundness, the hazelnut is a beautiful nut. Hazelnuts grow in husks, and when ripe, the hard-shelled seed falls out. The hazelnut is shelled, and eaten raw or roasted. Hazelnuts are rich in energy, dietary fiber and monounsaturated fatty acids, as well as an excellent source of minerals and vitamins, in particular vitamin E (the antioxidant). Nutrition aside, toasted hazelnuts are deliciously crunchy with a unique savory sweet flavor.

    The worldwide popular hazelnut-chocolate paste Nutella was originally developed in Piedmont in the late 1940s. It was called Paste di Gianduja (gianduja itself a mixture of 70% chocolate and 30% hazelnut dating back  to Napoleonic times, when taxes on chocolate forced chocolate manufacturers (in Turin) to come up with a creative solution, and add (cheaper) hazelnuts to the mix in order to make chocolate). The Paste di Gianduja developed in Alba in 1948 by pattisier Ferrero, was renamed in 1963 by Ferrero's son to become the famous Nutella. It is around the same time (1962) that Ferrero made the first, now equally famous Ferrero Rocher.

    Hope I did not whet your appetite for hazelnut cake or nutella ganache too much, because in this post crunchy, aromatic toasted hazelnuts enrich a basil pesto and liven up a tasty vegetarian main course.


    This recipe was inspired by dish I tasted in a ristorante in Serralunga, not far from Alba (in Piedmont, Italy). It was a rainy day last October, and we'd spent it touring the winery of Oddero Winery. The smell of fermented must still on my nose, we had a fresh pappardelle with a sauce that seemed so simple, yet was so refined in aromas and flavors. It was a sauce of crunchy celery and carrot with fresh Pesto Genovese (the Ligurian coast is an hour's drive away) and richly garnished with toasted, locally harvested hazelnuts.

    A Vegetarian Sauce of Basil Pesto, Vegetables and Hazelnut
    (recipe for 3-4)

    3-4 stalks celeri, diced small
    2 medium to large carrots, diced small
    150 gr button mushroom, diced fine
    1 tbsp olive oil
    handful hazelnut (brown skin removed and toasted), crushed coarse
    1-2 tbsp homemade basil & hazelnut pesto (recipe below)
    salt/pepper to taste

    Heat the olive oil in a pan to medium hot. Add the mushroom, and sweat (= stirring occasionally, let them get soft) for 2-3 minutes. Add the remaining vegetables, and cook very briefly for another 2-3 minutes: heating in the olive oil releases their aromas, but you do want to keep their refreshing crunch. Now spoon through the basil & hazelnut pesto, taste and adjust seasoning. Toss with a pasta of your choice and garnish with crushed hazelnut. The best combination is with fresh pasta (recipe following).


    Basil and Hazelnut Pesto
    1 tightly packed cup of fresh basil leaves
    2 cloves of garlic
    1/2 cup grated parmesan
    1 tbsp toasted hazelnut
    olive oil

    Using a large mortar and pestle, pound the basil leaves to a mash. While pounding, add the garlic, then the pine kernels, all the while drizzling in olive oil at intervals. It is a process of pounding, adding ingredients, smooth with olive oil, and over. When almost done (your "pesto" is a smooth paste), add the parmesan and carefully pound through. Taste and adjust seasoning.

    Tip: if you quickly "shock" the basil leaves in boiling water, and immediately cool them in ice water before pounding, your pesto will be bright green.


    Fresh Pasta
    400 gr plain flour (sieved)
    4 large eggs
    a lot of arm muscle

    Sieve the flour onto a clean work surface. Make a hole in the center and break the eggs one by one in the hole. Start to work the flour into the eggs (use a wooden spoon or your hands) until all egg is incorporated. It will be a very tough, crumbly dough at this point. Flex your arm muscles and start to knead: flatten it on the surface, shape into a round, flatten again. Stretch, pull, knead, and flatten. Over and over, for at least 8 minutes, or until your dough has gained elasticity. Wrap tightly in cling foil and leave for at least 30 minutes in the fridge.

    Set up a pasta machine (unless you want to use even more arm muscle, and roll out dough using a rolling pin). Dust the roller of the pasta machine with a little flour. Divide the dough into small balls (size of a small orange), and dust with flour. One by one: roll pasta through the machine on a wide setting. Roll out, fold double, and do again. Repeat a few times until your dough appears easy to stretch without tearing, and is silky soft (4-5 times). When you're happy with the dough, start to roll it out through the machine again, this time decreasing the width each time until you reach a desired width.

    Whenever the pasta dough appears to get even slightly sticky, dust with some flour.


    To make pappardelle and other ribbon pasta
    Dust the pasta sheets you made, roll up carefully, and cut into 1 inch-wide ribbons for papardelle. Slice thinner to make fettucini, or even thinner for spaghetti. Alternatively, fit the pasta machine attachment for desired pasta shapes. Dry on a kitchen cloth for about ten minutes, and roll into nests until ready to use (I keep mine wrapped in ziplock in the fridge (this being fresh (raw egg) pasta, I prefer to use it within 24 hours). Bring a large pot of water to a boil. When it boils, add a good pinch of (coarse) salt. Cook the pasta for 3-5 minutes, or until it is soft to bite.

    There are many, many fresh pasta recipes available online. This fresh pasta recipe is based on the guidelines of Marcella Hazan as she explains them at length in Marcella Cucina (1997).


    Follow Life in the Food Lane on Facebook for updates on new posts and other adventures in the Food Lane.


    Sunday, October 14, 2012

    Sarawak Black Pepper Sauce & Caramelized Eggplant


    This recipe post is a "follow-up" to my blog post Sarawak's Indigenous Food Treasures (here). Black Pepper Sauce is popular throughout Malaysia and Singapore. It is a dark and syrupy (Chinese) sauce with many layers of salty and sweet, acidity and spice. Oh so good with beef, this sauce loves to stick to stir-fried prawns, crabs, tofu, and even vegetables just as well. You can use any black pepper, but Sarawak Black Pepper gives it an extra aromatic dimension.

    This recipe is my version of Black Pepper Sauce. It is loosely based on how I've seen it prepared in Miri (Miri has a large Chinese population). Or rather, what I saw going into the wok: never did I see any of them use exact measurements. I use a good measure of kecap manis (sweet soy sauce), because I like the sweetness set off against the spiciness of the black pepper. Feel free to adjust ingredients to your personal taste.

    what can I say, I felt creative 

    Sarawak Black Pepper Sauce
    (makes about 1 cup)

    1 full tbsp coarsely pounded Sarawak Black Peppercorns
    1 medium red onion, chopped fine
    1-2 cloves of garlic, minced (roughly 1 tbsp)
    1 inch piece fresh ginger, grated
    1-2 red chilies (heat to taste)
    1 tbsp Belacan* (shrimp paste, if you don't have belacan use any other)
    1/3 cup kecap manis (sweet soy sauce)
    1/3 cup (salty) soy sauce
    1/3 cup tbsp oyster sauce
    oil for stir-frying

    Pound onion, ginger, garlic, and chillies into a paste using mortar and pestle. Add the belacan paste and pound some more. By all means, use a blender if you prefer. Heat the oil in a wok or shallow pan. Add the pounded paste and stir-fry until soft and fragrant. Add both sweet and salty soy sauce, as well as the oyster sauce. Reduce over low heat until thick and syrupy. Add a few drops of water if the sauce gets too thick. Add the coarsely pounded black pepper, stir in well and simmer for another 2-3 minutes, until all the aromas and flavors have blended.

    Ideally, the sauce gets time off-heat to infuse all its flavors of sweet, salty, acidity, and heat. You can use it immediately, but it is even better if you leave it be overnight.


    Caramelized Eggplant with (Sarawak) Black Pepper Sauce

    Slice eggplant in 1cm thick slices, and sprinkle with a little coarse salt. Heat vegetable oil in a skillet and pan-fry the eggplant until it is soft and caramelized. Stack the slices, spooning a lick of black pepper sauce in between the slices. Drizzle some more black pepper sauce on top and serve.

    Beef Tenderloin with (Sarawak) Black Pepper Sauce & Grilled Fennel
    Another favorite: tender beef fillet, cubed and stir-fried quickly with this sweet spicy black pepper sauce. Serve with grilled fennel: the hint of licorice in the fennel pairs very well with the sweet-savory spiciness of the sauce.

    Beef Tenderloin stir-fried with Sarawak Black Pepper Sauce and Grilled Fennel
    ready to pound the Sarawak black peppercorns

    Follow Life in the Food Lane on Facebook for updates on new posts and other adventures in the Food Lane.


    Sunday, September 2, 2012

    Zucchini Flowers Stuffed with Homemade Ricotta


    When I lived in Cairo, I sometimes found zucchini flowers among the zucchini as they were tossed in a crate ready to be sold in the supermarket. Many of them crushed and wilting, it always paid to take the time and sift through the zucchini, searching for the surviving flowers.

    In Dubai, I have seen them at the farmers market, and lucky me: a food blogger friend growing zucchini in her rooftop garden, offered me a bundle. You can probably get them through gourmet stores like Lafayette Gourmet and Markets & Platter if you order directly.

    At the local farmers market in the summer in Quebec, I often get them from the same farmer. Once I bought a whole box of gorgeous, sun-kisssed yellow super-fresh (as in picked only a few hours before) zucchini flowers. Still attached to small zucchini, they were carefully packed side by side in a cardboard box. As I paraded my box with yellow beauties around the market, I created quite a buzz with people coming up to me. Mostly wanting to know what they were, and - to my response that these were zucchini flowers that I would stuff, dip in batter and deep-fry - would invariably ask: could they come for dinner.

    Ricotta stuffed zucchini flowers are a great vegetarian main course. This time I served them with grilled polenta and a rosemary tomato sauce, but they go well with many different sides.

    Zucchini Flowers Stuffed with Homemade Ricotta
    (recipe is for 4/main course)


    The Zucchini Flowers 
    (3 per person for a main course)

    Rinse and dry well (but carefully, so as not to damage the flower).

    These zucchini flowers were the female flowers (or so I was told: the female flowers grow on the zucchini itself, whereas the male flowers grow directly on the stem). Inside the calyx of the female flower you will find a yellow furry-looking little bulb. This is the pistil, which needs to be removed.

    Check the outside bottom of the flower: if there are little hook-like leaves (they are tiny), carefully snip them off. Following are two methods to open up the flower and prepare it for stuffing.

    Method 1: slit the flower open length-wise and remove the pistil (remember, that yellow furry-looking little bulb). Fold the flower open (like a book), place a ricotta "ball" in the middle and fold the leaves back over.

    Method 2: hold the flower's calyx in your cupped hand and fold the outer petals out over your hand to create a cup to fill. Carefully snip off the pistil. Place a ricotta ball inside the flower and fold the leaves over to close the cup. I used this method for my Quebecois zucchini flowers: its calyx really was a beautiful little cup.

    ps. traditionally, ricotta is an Italian whey cheese, made from the whey that is left after curds are strained to make cheese. This leftover whey is brought to a boil again (re-cooked, or ri-cotta) so the proteins can coagulate, strained again and those curds are the basis for the ricotta cheese. For a link to artisan Italian cheeses, including Abruzzo ricotta, click here 


    Homemade Ricotta
    (recipe yields about a cup of ricotta)
    3 cups milk 
    1 cup whipping cream*
    1/4 cup (white) vinegar
    1/2 tsp sea salt
    (*or use 4 cups milk only)

    Bring the milk and cream with the salt to a boil, add the vinegar and stir for about a minute. It curdles pretty much immediately. Turn off heat. Don't stir, just leave for about five minutes. Prepare a sieve with a fine-woven/cotton tea towel (cheese cloth is best as it is a fine-woven cloth that allows liquid to seep through yet collect all solid parts). Leave to strain, and occasionally stir to allow the liquid to better seep through. In technical terms: what is left in the cheese cloth is the curd, whereas the liquid in the bowl is the whey.


    Herbs and Parmesan
    Add a cup freshly grated parmesan, a 1/2 cup of chopped flat-leaf parsley and basil to the ricotta, as well as a small teaspoon grated lemon peel and a pinch of chili flakes. Season to taste with fresh ground black pepper and coarse sea salt.

    Shape the herbed ricotta into balls, the size roughly measured according to the base of your zucchini flower (for my zucchini flowers, a diameter of 2-3 cm (about one inch) was a good size). Chill until ready to use.

    Batter
    1 cup ice-cold water
    1 cup plain flour
    1 egg

    (tip: heat the frying oil as you prepare the batter).

    Beat the egg and add the ice-cold water. Mix in the flour carefully (do not over-mix). Use immediately.

    Dip the prepared and stuffed zucchini flowers in the batter. Deep-fry in the hot oil until crisp. It takes a few minutes.

    After posting this, I tried out zucchini flowers stuffed with (ready-to-use) duck confit, which I shredded and added to mashed white beans with fine chopped parsley and spring onion. Same batter, same process, the zucchini flowers with duck confit were amazing!