Pages

Showing posts with label seafood. Show all posts

Saturday, August 2, 2014

Beach-Dug Clam Chowder

We went clam digging in Maine. What an experience! It had been years and years since I stood hunched over a muddy beach with a shovel and a bucket. At the time, I was a young child on a Zeeland beach on the North Sea coast, digging for razor clams. The idea is the same: you look for a little "air hole" in the sand, and you dig. Not ON the hole, just near enough. And then you claw with your hands in the sand, removing it carefully until you feel the shape of the shell. This time, in Maine, big clams prove worth the finger-scraping effort and the mud-grey nails by the time the tide starts to roll back in.

Beach-Dug Clam Chowder
10 or so big clams (or less if you didn't dig long and hard enough)
1 cup heavy cream
1-2 cups clam juice (what you steamed the clams in)
1 cup diced kohlrabi
1 cup diced potatoes
1/2 cup diced fennel
1/2 cup chopped onions
1 garlic clove, crushed
1 small twig of fresh lovage
1 small bay leaf
1 twig of fresh thyme

Steam the clams open 2-3 minutes in water to which you've added a splash of white wine, a pinch of salt, and some coarse chopped aromatic vegetables like onion, leek, celery and garlic. Let cool enough to handle, then pick out the clam, drain every last drop of clam juice from the shell into a collecting bowl. Strain the steaming liquid from the pan also into this bowl, but use a cheesecloth if the water seems gritty.

Put the kohlrabi, potato, fennel, lovage, thyme, onion, bay leaf and garlic in a pot with the clam juice: use enough clam juice to just cover the vegetables. Simmer for up to 15 minutes, or until soft. Remove the lovage, thyme and bay leaf, and add the cream. Add more clam juice if the soup is too thick (or not if you like it that way). Bring to a slow boil and add the chopped, cooked clams. Turn off the heat, and leave to infuse for 2-3 minutes. Add some chopped chives, and serve with a good chunk of hearty bread and good quality butter.

ps. I made exactly the same chowder minus the clam juice and clams, using fresh haddock.


I cooked this staying at the New Moorings Farm in Sedgwick, Maine. See the story With A Pitchfork In My Kitchen here

Thursday, June 12, 2014

Chard Stalk Crab Cakes

chard stalk crab cakes ready to go into the pan
In the Gulf region of the US, picked fresh crab meat is oh so readily available, and I love it. It beats picking fresh cooked crabs yourself. But if you have to: cook your crabs, let them cool, crush the shells and start picking out all the meat without damaging your fingers on the sharp shells, and definitely don't add any shell particles to the meat.

Don't get me wrong, I love to pick and eat crab. But at the table, in company. There is nothing even remotely fun about picking crabs all by your lonesome at the kitchen counter.

So, ready-picked fresh crab meat for me, if I can find it. When I make crab cakes, I always vary with what goes in, spice-wise. I think most people who make crab cakes do. When I had a beautiful bunch of Swiss chard in my hands, I decided to use some of the stalks - finely diced - as flavor and texture ingredient in the crab cakes. Chard stalks have a natural savory crunch. I loved the result: the chard stalks gave a crispy freshness, as well as a touch of vibrant red.

Chard Stalk Crab Cakes
makes 4 burger-size crab cakes

1 cup picked fresh crab meat
1 medium egg, whisked
1 tbsp mayonnaise
1 tsp Dijon mustard
3-4 drops tabasco sauce (or to taste)
1/2 tsp worcestershire sauce
1 tsp fresh lemon juice
1 cup breadcrumbs (I use my own, from leftover baguette or ciabatta)
1 tbsp finely chopped fresh parsley
1/2 tsp salt (or to taste - the mustard and mayonnaise already contain salt)

This is the basic mix. From here on, I vary with what I add in flavors, herbs, and spices. Sometimes cornichons and capers, other times I add grated parmesan and use fresh chives instead of parsley. For instance. For these Chard Stalk Crab Cakes, I added:

1 tbsp finely chopped spiced beans (I used my homemade spiced beans)
1/2 cup finely diced chard stalks

for pan-frying
1 tbs olive oil
2 tbs unsalted butter

  • Mix mayonnaise, mustard, lemon juice, tabasco, and worcestershire sauce together. 
  • add the chard stalks, spiced beans, and parsley
  • Taste the mixture, and add salt accordingly. 
  • Mix in the whisked egg. 
  • Spoon in the crab meat carefully, and add the breadcrumbs, half of the amount first. Check for thickness of the mixture, and add more if needed. What you are looking for, is the a texture similar to a coarse mince meat, and easy to shape into patties without falling apart. 
  • Leave to infuse all the flavors for an hour or so, then shape into patties.
Heat olive oil and butter gently until the butter is slightly foaming. Pan-fry the crab cakes carefully on one side for 3-4 minutes (over medium heat), turn over, and pan-fry for another 3-4 minutes (still over medium heat).

Visit my main blog www.lifeinthefoodlane.com, with latest posts including A Taste of the Southwest (New Mexico), the D-Day Museum in New Orleans, and Slow Food: My Next Chapter. 

Or just find me on Facebook or Twitter

Monday, February 10, 2014

An Elegant Hot Dip and Shrimp Boil Chowder

Last week, a ziplock full of leftover shrimp boil came my way again (see "Shrimp Boil Artichoke Salad" here). Juicy shrimp, spicy sausage, mushrooms, corn, and potatoes soaked with the flavorful boil. We ate with gusto, and still there was enough left over for me to "play" with. Cold outside, fireplace burning, I made a chowder with the remaining potatoes, shrimp and corn. And a lush "shrimp boil avocado" dip. Both recipes below, and as usual: the list of ingredients suggests alternatives if you do not have the same leftovers. You will need to spice it up to taste, though: it's only when you have such wonderful shrimp boil leftovers that the main ingredients provide a depth of flavor that needs very little else.

Shrimp Boil Chowder
A great way to use those leftover red potatoes, cooked in the spicy boil and soaked with seafood and spice flavors. This chowder could not be any easier: it takes all of its flavor from the shrimp boil. The only "extra" ingredients in this chowder are the stock, the cream, and 1/2 cup of finely diced celery, which I add for a refreshing depth, but could be left out. One thing: these shrimp boil potatoes are spicy. And as a result, your chowder will be spicy. If you want to tone down the heat in the chowder, add a large russet potato, chopped up and cooked (remember: you are using boiled potatoes, so you can't just add the russet potato uncooked - it's why I suggest you use cooked russet potato).

Ingredients
10 or so small boiled red potatoes (leftover from shrimp boil)
1 large russet potato, cooked (optional: it tones down the overall spiciness if using shrimp boil leftovers)
1 cup cooked corn kernels, scraped from the ear (leftover from shrimp boil, keep the "stalk")
1 cup chopped cooked shrimp (leftover from shrimp boil, keep 1 or 2 for garnish if you wish)
1 liter well-seasoned organic stock (approx. 4 cups, or 1 quart)
1/2 cup finely diced celery
1/2 cup double (whipping) cream
salt/pepper to taste

Heat the stock, and add the bare corn "stalk". It will lend some additional flavor to the stock. Take it out before you blend the soup! Peel the red boiled potatoes, cut up and add to the stock in a large pan. Cook to infuse for 2-3 minutes, then puree with an immersion (handheld) blender, but watch the ratio potato-liquid. You want a thick, creamy soup, so it may work best to keep a cup or so of the stock separate, blend the rest to a puree and add the remaining stock as you go until you achieve the desired thickness. At this point, add the finely chopped celery to soften. After 2-3 minutes, add the corn kernels, chopped shrimp and cream, and cook through for 2-3 minutes. Check the taste and adjust if needed. Serve hot with crusty French bread.

Shrimp, Corn and Avocado Dip

1 cup chopped boiled shrimp (or leftover from shrimp boil)
1/2 cup fresh cooked corn kernels (or leftover from shrimp boil, scraped from the ear)
2-3 cloves garlic from the shrimp boil (soft and soaked with flavor) or 1 large fresh garlic clove, chopped fine
1 cup cream cheese
1/2 cup sour cream
1 medium ripe avocado, cut into chunks
1 handful fresh parsley (leaf only), chopped fine
1 handful fresh koriander (leaf only), chopped fine
1 tsp (or a squirt) fresh lime juice
a few drops of tabasco, or to taste
salt/pepper to taste
1 cup grated cheese (I use a 50-50 ratio of parmesan and mild aged farmer's Gouda), optional

Mix together cream cheese and sour cream until creamy and free of any lumps. Mix in chopped herbs and finely chopped garlic. Season with the lime juice and tabasco (careful with the latter if you are using shrimp boil leftovers). Add the chopped shrimp, corn and avocado chunks, and carefully spoon through. Put in an ovenproof serving dish, cover with the cheese and bake in a hot (400F, or 200C) oven for 10-15 minutes, or until cheese has melted and dip is bubbling. Serve immediately, for instance with blue corn chips.

For an elegant appetizer, spoon the avocado shrimp boil dip in filo cups, and bake at 350F for about 10 minutes, or until hot throughout.

You can also serve this avocado shrimp dip cold (room temperature). In that case, leave out the cheese and sprinkle with fresh herbs and chunks of avocado instead.

You may also enjoy: "Shrimp Boil" and Artichoke Salad


Find Me On Facebook Here


Tuesday, January 28, 2014

Roasted Golden Beetroot and Lobster Risotto

I like to roast beetroot bulbs. It brings out their natural sweetness, and deepens their flavor. It makes for instant flavor when you use them in a soup, or like here: in a risotto. Roasting also deepens the color, and the roasted golden beetroot gives the risotto a warm golden yellow. The eye does not go wanting with this risotto!

Ingredients (makes for a main course for 4)

2 cups Arborio rice (or other risotto rice)
100 gr butter
20 gr onions, finely chopped
1-2 liter good, flavorful stock (from scratch or organic cube, your choice vegetable or chicken)
40 gr parmesan cheese, grated
your flavor ingredient(s): in this case 1 cup finely diced roasted golden beetroot
2-3 medium cooked lobster tails, cut into chunks

It is important to have a good, flavorful stock: the grains will soak it up and make or break your risotto. If too bland, your risotto will be bland too. For the risotto you are making, add part of your flavor ingredients to the stock to simmer at least 30 minutes prior to using the stock. For instance, if you're making a mushroom risotto: add mushrooms to the stock. I added chopped beetroot to the stock prior to using it. Also, be playful with your stock: add aromatic herbs and scraps from vegetables to deepen the flavor.

Directions (to make a risotto this way will take about 20-25 minutes start to finish)
  • gently soften the onions in 1/3 of the butter
  • add the risotto grains to "roast" (but not brown): you will notice they get a little glossy
  • add a ladle of hot stock: the shock makes the grains absorb the liquid rapidly and soften the starch to be released. When the liquid is all soaked up, add another ladle. 
  • this is the process for the next 20 or so minutes: add a ladle of stock every time the liquid is incorporated. Stir to get all the grains off the sides of the pan and bottom, and simmer. I don't stir continuously, but am close to the pan at all times.
  • After about 10 minutes, add half of the diced beetroot with your next ladle of stock.
  • Continue to add stock and stir until the risotto starts to thicken (it will look creamier and grains have swollen in size). At this point, taste a grain and check for desired tenderness. You are looking for a little bite, but nothing "chalky". If still too firm, continue with stock and stirring. If soft enough to your liking, and not a hint of chalkiness: take off the heat, add the remaining beetroot, grated parmesan and butter. Stir well to incorporate.
  • Add another ladle of stock if you want your risotto a little "runny". Add the lobster chunks to warm through (or warm separately and serve on top of risotto).
Garnishing herbs that will go well with these sweet and seafood flavors are fresh chives, young parsley, or even fresh (wild) thyme. I also like to sprinkle a couple of rose peppercorns.

ps. you could use the lobster heads for the stock. I didn't, as I find it makes the risotto overly sweet, whereas a hearty, herb-rich stock adds more savory notes to the sweetness of the golden beetroot and lobster meat. I do, however, use the "coral" chopped up and added to the risotto.
the natural beauty of golden beetroot


Saturday, December 21, 2013

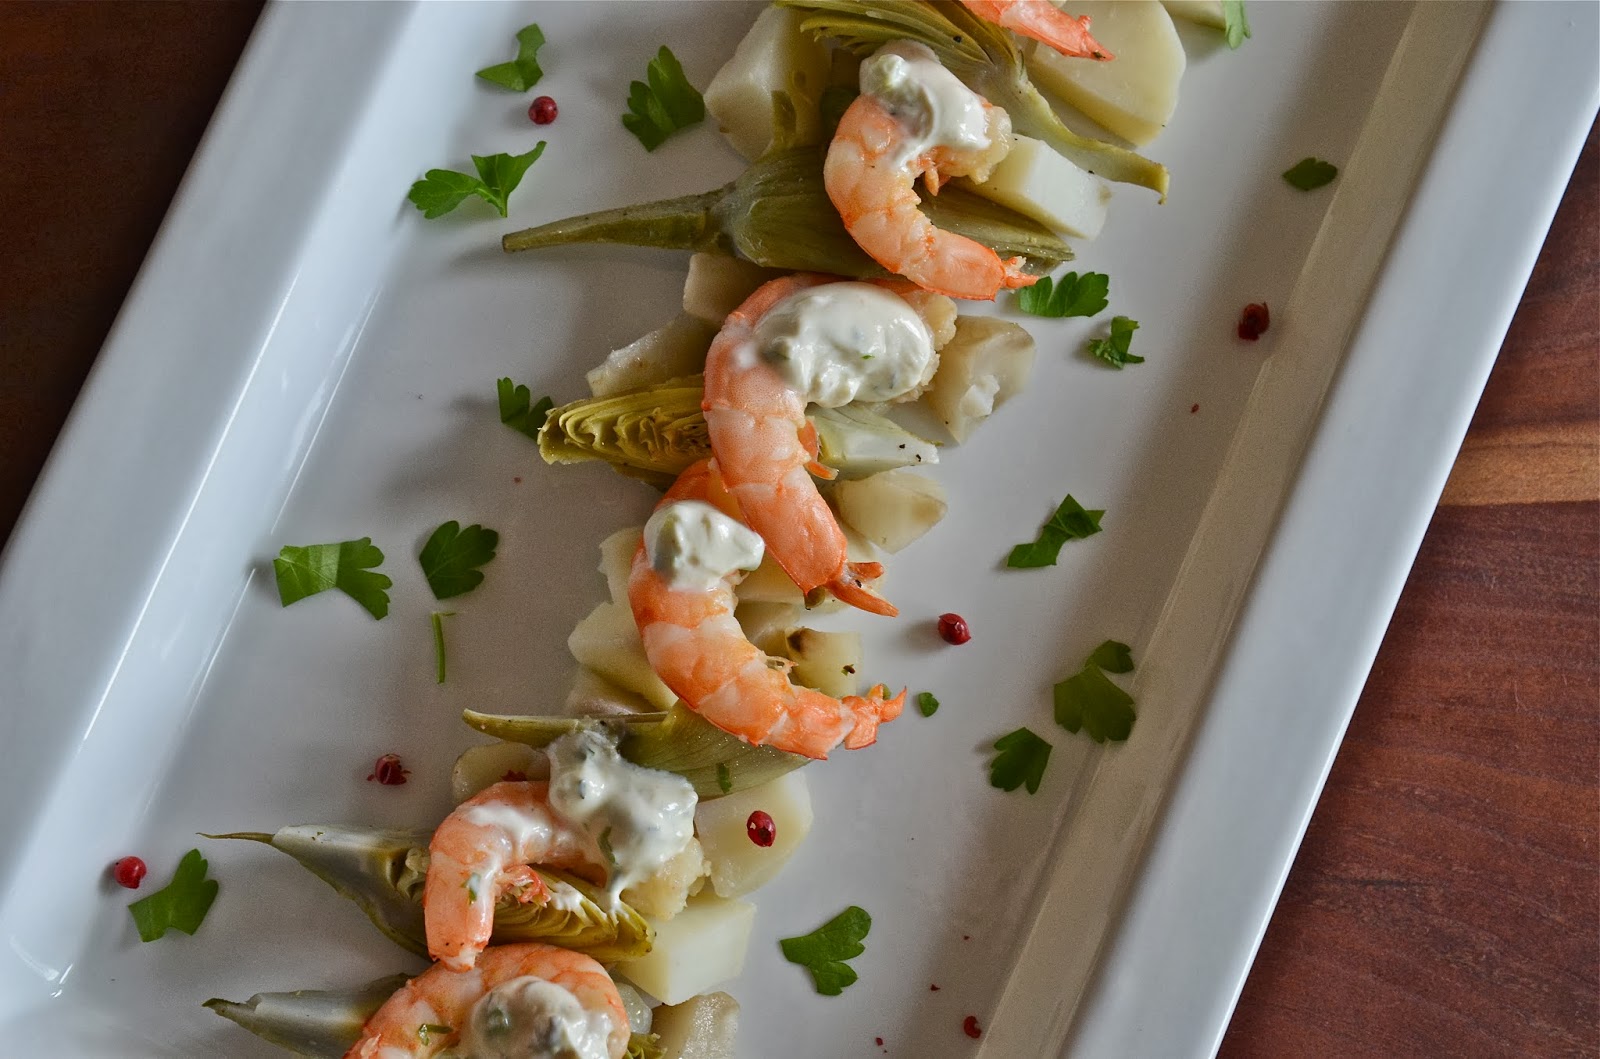
"Shrimp Boil" & Artichoke Salad

This recipe is based on leftovers, from fresh artichokes and roasted sunchokes to a precious gift: a ziplock bag full of leftover shrimp boil. A shrimp boil is a one-pot meal that starts with a good, well-spiced stock in a large pot with strainer. My friend cooks it outside, on a big burner. A born and bred New Orleanian of Italian descend, he is one of these innate gourmands whose body language even changes when talking about food. As if he's physically embracing all the deliciousness of what he is talking about. His eyes sparkle with pleasure when he describes a recipe, a method of smoking, a time to "soak up all these flavors".

In making shrimp boil, he carefully seasons his stock, always smiling when he mentions the "holy trinity" of Cajun cooking: onion, bell pepper and celery. When he is happy with the taste of the stock, he adds skin-on baby potatoes, pieces of andouille, and whole button mushrooms, each ingredient enjoying the interaction of giving and taking flavor. He adds corn on the cob just before adding the main characters: a huge heap of unpeeled shrimp. He stirs, times, tastes, stirs again, fishes out a potato, breaks it open, takes a bite, looks pensive across to the rest of us, and - nodding happily - he grabs the bag of ice he has ready, and empties it in the steaming hot pot of shrimp boil. It is to stop the cooking. He leaves the shrimp to soak up all the flavors, and shortly after lifts out the strainer. The shrimp boil is ready to be eaten. He can't wait for the crawfish season to begin, he says. And the mere thought is making my mouth water.

When we left that evening, he rushed to the fridge and handed me a ziplock bag with leftover shrimp boil. The only reason there were any leftovers, by the way, is that his generous shrimp boil had been preceded by an irresistible scrumptious house-smoked turkey and andouille gumbo.

Below recipe gives an option for this salad if you do not have leftover shrimp boil. As for the roasted sunchokes and artichokes, they were leftover from another meal (with seared tuna). Note: while roasted sunchokes are divine, and will add a great dimension to this salad, they are also not always available. So add if you can find them, but don't despair if you have none. The main flavor-interaction is between the shrimp and artichokes, liaised with the sour cream "tartar". Just make sure you use fresh artichokes!

"Shrimp Boil" & Artichoke Salad with Sour Cream Tartar

Appetizer for 4

16-20 peeled large cooked shrimp
2-3 roasted sunchokes, cut into smaller pieces (optional)
4 cooked baby potatoes, halved
4 cooked button mushrooms, halved
4 cooked small artichokes, quartered*

Sour Cream Tartar
1 cup sour cream
1 tbsp Dijon mustard
1 tbsp finely chopped fresh parsley
1 clove of garlic, minced
1-2 small cornichons, chopped fine
1/2 tbsp capers (tiny ones or chopped larger ones)
1-2 slices jalapeno, chopped (optional)
1 tbsp chives, chopped fine
salt/pepper to taste
lemon juice to taste

For the sour cream tartar: mix all ingredients together, taste, and adjust to your liking. Make a little ahead so the flavors can mingle!

Being leftovers from a shrimp boil, your potatoes, mushrooms and shrimp will be bursting with flavor. Simply use as is, and arrange with artichoke quarters and sunchokes on a plate. Add dollops of the sour cream "tartar" et voila.

If your salad-ingredients do not come from a shrimp boil, you could cook the baby potatoes, mushroom and shrimp in a flavorful stock (including bayleaf, celery, bell pepper, onion, garlic, cayenne pepper) as follows: start with the potatoes, then add the mushroom, and last: add the shrimp. 


Arrange all ingredients on a plate or platter, top with the shrimp, add dollops of sour cream, and serve.
if you can't find baby artichokes, use large ones: boil them as you would an artichoke, eat the fleshy ends of the leaves with a dipping sauce, and keep the heart (bottom) for this salad.
* baby artichokes can be eaten whole. You take off the hard outer leaves, cut the sharp tops of all leaves, peel the stem back. Rub with lemon juice. I quarter the artichokes before boiling: I trim the inner core (usually fibrous and hairy in larger artichokes, in baby artichokes it's just a tiny bit of fuzz), trim the harder top some more, and then boil the quarters until soft. Immediately after, put in ice water to cool down. Drain and use.

Don't forget to like Life In The Food Lane on Facebook (here)

Monday, August 26, 2013

Sockeye Salmon Tartare and more...


Romancing the Salmon is a story about a hike done once upon a time in the Alaskan Panhandle near Juneau. It was the season for sockeye salmon to return to their spawning grounds. Sockeye salmon is Pacific wild Salmon, and belongs to the species Oncorhynchus. It is a species that usually dies after spawning once (unlike the Salmo species, to which Atlantic salmon belongs). For the full travel story Romancing The Salmon click here.

Below are two recipes for fresh Pacific wild sockeye salmon.

Sockey Salmon and Roasted Beetroot Tartare
200 gr fresh Sockey salmon (skin removed)
1 small beet, roasted, peeled and grated fine
1 tbsp finely chopped shallot
1 tbsp finely chopped dill
t tsp grated fresh ginger
1 tbsp finely chopped caper apple (or capers)
3-4 cornichons, finely chopped
1 tsp Dijon mustard
1 tsp fresh lemon juice
1 tsp finely grated lemon peel
a few drops of good quality olive oil

all above ingredients are to taste: adjust accordingly!

Mix all ingredients except salmon together in a bowl and leave to marinate for about an hour (or until ready to use but no more than 2 hours). "Mince" the salmon fillet by hand, chunky or fine to taste. Mix in with the marinated ingredients. Season to taste and serve immediately.
Lemon & Dill Cured Sockeye Salmon

This is not an exact-measurements recipe. Depending on the size of fillet you have, you need to adjust the amounts of sugar, salt, dill, and lemon. I have made this recipe also using a mix of citrus peel, chopped lemongrass, and coarsely chopped koriander.

2 pieces of salmon fillet, equal size (roughly 300gr each)
1/2 cup coarse salt
1 cup raw cane sugar (you can use caster, but I prefer this unrefined sugar)
1 bunch of fresh dill, sprigs only
a tablespoon of black peppercorns, crushed coarse
grated peel of a lemon
  • Mix sugar and salt together. Add the peppercorns, lemon peel and torn dill. 
  • Spread a piece of clingfoil on the kitchen counter. 
  • Spoon a layer of the salt-sugar mix, place one piece of salmon skin-side down on it
  • heap a generous amount of salt-sugar mix on the salmon and place the other piece on top, flesh-side down (like a sandwich)
  • heap another amount of salt-sugar mix to cover the skin-side of the top salmon piece
  • wrap in clingfoil and place in a tray. Put a light weight (a can of beans, for instance) on top.
  • Put in the refrigerator to cure for minimum 5 and maximum 7 days. Turn every day.
  • After 5-7 days, the salmon is ready: scrape off dill and lemon
  • the liquid that appears as the salmon cures are the pickling juices. Very tasty, you can add a dollop of mustard to turn it into a little sauce to serve with the salmon.
  • slice the salmon thin and serve


Ingredients always deserve to be treated with love and respect, and all the more so for ingredients that come from the wildest heart of mother nature. Here also, sustainability is key. Sockey salmon can only survive if measures are taken when numbers are low. Legal fishing, limitations in numbers caught, protection of its natural habitat (including their breeding grounds) will sustain its numbers.

Follow Life in the Food Lane on Facebook for updates on new posts and other adventures in the Food Lane.

Sunday, February 3, 2013

Black Lentils & Grilled Swordfish

Black Lentils, Shaved Fennel, Cherry Tomatoes and Green Beans with Grilled Swordfish and a Salsa of Preserved Lemon, Capers & Tomato


The natural beauty of food. Pale white shaved fennel, bright red cherry tomatoes and green beans contrast with the dark, glistening lentils in this healthy gourmet salad. Mediterranean flavors of preserved lemon, fresh basil, and ripe tomatoes mingle with the hearty taste of black lentils, fried onions, and crushed garlic.

I like a little kick of spice in this salad. You can use chilli flakes or better yet: a hearty, spiced sausage. Like chorizo, or as I did here: fiery red, spicy Nduja from Calabria.

Black lentils are also called beluga lentils, because of their striking resemblance to caviar when cooked. Nutrition-wise, lentils are low in fat, high in protein and fiber. They cook quick and have a rustic, earthy flavor.

This black lentil salad is excellent on its own. I have made it before with scallops, and another time with grilled halloumi for a vegetarian meal. This time I served it for dinner with grilled swordfish and a salsa aromatic with preserved lemon, capers, tomato and basil. 

A spicy kick works wonderful with the black lentils. I still had some Nduja from Calabria that I used
preserved lemon gives this salad a refreshing taste
Black Lentils with Grilled Swordfish and a Salsa of Preserved Lemon, Capers and Tomato
(recipe for 2-3)

2-3 swordfish steaks
200 gr black lentils, rinsed
1 medium onion, sliced thin
1 cup red cherry tomatoes, halved
1 bulb fennel, shaved thin
200 gr French beans (haricots verts) and/or mangetouts, cooked
1 clove garlic, crushed
Spicy sausage like chorizo (or if you have it: Nduja), or chilli flakes, to taste
olive oil
salt/pepper to taste
salsa
1 small or 1/4 large preserved lemon, skin only, sliced thin
1 clove of garlic, crushed
1 tbsp capers
1/2 cup cherry tomatoes, quartered
4-5 basil leaves, shredded
1/2 cup olive oil
fresh lemon juice (to taste)
salt/pepper to taste

  • For the salsa, mix all ingredients together in a bowl, add olive oil and lemon juice to taste, as well as salt and pepper. Leave to infuse until ready to use.
  • Cook the lentils in ample water (unsalted) until soft, yet still have a bite (takes about 20-30 minutes, but keep your eye on them after 20 minutes). Drain and rinse.
  • In the meantime, toss the shaved fennel with a squirt of lemon juice, a few drops of olive oil and a sprinkling of salt. Leave for about 15 min or longer: it softens the texture of the fennel.
  • In a casserole, heat a tbsp of olive oil to medium hot. Add the sliced onions and stir fry over low to medium heat until the onions are browning slightly. Add the spicy sausage and stir for about 1-2 minutes. Add the garlic and stir for another 1-2 minutes. Add the cooked lentils and cherry tomatoes. Stir to mix all the flavors. Add seasoning to taste. Off heat, mix in the green beans and shaved fennel. You can serve the salad either hot, (luke) warm or even chilled.
  • Season the swordfish and grill (either pan grill or on the BBQ) to your liking. Serve topped with the salsa over the lentil salad.
Follow Life in the Food Lane on Facebook for updates on new posts and other adventures in the Food Lane.


Sunday, December 9, 2012

Salted Cod for Christmas

stockfish and salted cod at the Norwegian stand at Slow Food's Salone del Gusto/Terra Madre 2012
As a creamy puree, a savory fritter, baked with tomatoes, or beaten to a mousse with olive oil, salted cod is a Christmas time favorite in many countries.

Salted Cod goes by the name of bacalhau in Portuguese, which means "codfish". When in Portuguese you refer to the fresh cod, you will specify by calling it bacalhau fresco. Similar to bacalhau, salted cod is called bacalao in Spanish, and baccala in Italian. The French word for codfish is cabillaud, similar to the Dutch word kabeljauw, where bakkeljauw refers to the dried, salted version again. To throw in a couple of completely different words: in France it is also known as morue (derived from its latin Linnaeus classification, gadhus morhua). It is saltfish in the Caribbean, and in the Nordic regions, where it is mostly produced, it is klippfisk.

It is said that Basque fishermen hauled up cod in the waters near Newfoundland in the early 1500s, even before Cabot declared it a New Found Land. The fish was cleaned and salted, to be preserved for the long sea journey back. Today, Nordic countries are the biggest producers of salted cod, with the biggest importers found in southern Europa and Latin America. Cod numbers are on the decline, and other white fish are now also used to make salted fish, in particular pollock and haddock.

If cod is dried, but not salted it is stockfish. Stockfish is dried in cold air and wind. It needs to be pounded till you're sore, and then soaked for days to break up the fibers. 
salted cod soaked for 2 days
Salted Cod needs to be soaked in cold water overnight, or even for 2-3 days, changing the water every 6-8 hours. It is then ready to be used for cooking.

Easy Salted Cod Fritters
1 batch of (beer) batter
250 gr salted cod, soaked and shredded
fresh chives or thyme
minced garlic
seasoning to your liking: I like to add a pinch of cayenne pepper.

Make a batter using 1 cup plain flour and 2 tsp baking powder, adding ice cold beer (or soda water!) little by little, until your batter is still thick.

Add the soaked and shredded salted cod, the minced garlic and finely chopped herbs. Add the seasoning. Mix in well, and deep fry a test fritter: taste it for seasoning, and adjust if need be. Then proceed to deep-fry the rest. The thing is: even after proper soaking, you never know how salty the fish still is. It may be salty enough to season the batter, or additional salt may be needed. The only way to find out, is to test-fry and adjust.

Note: once all is mixed in (and especially salt), the batter should not be left too long. Best is to proceed with the deep-frying straight away.

Serve these Salted Cod Fritters as pre-dinner cocktail snacks for Christmas or New Year's Eve.

Salted Cod Cream 
(roughly based on Venetian style Baccala, which strangely enough uses stockfish: the dried cod. This recipe uses salted cod). The difference with brandade is mainly the milk: brandade is soaked and simmered cod beaten into a creamy sauce with olive oil).

500 gr salted cod, soaked
1/2 liter milk
1 bay leaf
1-2 cloves of garlic, crushed
1 medium onion, quartered
a few black peppercorns
sprig of fresh thyme or rosemary

Bring the milk to a boil, add the soaked salted cod and spices and simmer for about 30 minutes, or until the cod falls apart. Take out the cod and pound (or shred) fine. Add the milk little by little to make a creamy sauce. Serve it over grilled polenta squares, for instance. The Venetian Baccala is served with creamy polenta.

Baccala Gratin: layer the sauce with sliced potatoes (blanched so they are not completely raw, but still have a crunch). Top with a mixture of breadcrumbs and cheese, and bake au gratin in a moderate hot oven (180C) for about 30 minutes, or until the potatoes are soft.

Chilled Baccala Cream topped with smoked salmon (for instance) makes for a beautiful Christmas dinner starter!


A Creamy Salted Cod Puree
This recipe is the same as above, but adds potato to the milk. To repeat the recipe with this adaption:
Bring the milk to a boil, add the soaked salted cod and spices and simmer for about 30 minutes, or until the cod falls apart. Strain the milk, and bring back to a boil with the potato (2 cups cut potato per 500gr salted cod). Cook until the potato is soft. In the meantime, shred the cooked cod until fine. When the potato is cooked, mash it in the milk until it has a consistency of a creamy puree. With a wooden spoon, work in the shredded salted cod.

I use this Salted Cod puree as a mash for grilled fish, or - as in the photograph - with grilled octopus. It is also perfect to scoop into an earthenware dish and top with a herbed cheese and breadcrumb crust to bake au gratin in the oven. A great wintertime starter, and of course would do appetizingly well as part of your Christmas dinner.

I would love to hear what you do with salted cod!


Sunday, May 6, 2012

Delicacy of a Sea Monster: Cooking With Octopus


It was years ago in Kaş, a fishing village on the rocky southern coast of Turkey. A fisherman had caught an octopus and was beating the thing silly. I was watching it from a distance. He raised it over his head and crashed it hard and repeatedly on the rocky pier. Next, he swung it over his head, round and round as its octo-arms swirled in the air. I thought he was making a show of it. Later, I found out the beating is done to tenderise the no-bones-all-muscle octopus, and the swinging to get rid of the slime. 

While I've eaten octopus many times, I never cooked it myself. Until recently. Less romantic than buying it from a fisherman on a rocky pier, I got my octopus at the seafood section of Carrefour Dubai. Tenderized, cleaned and ready to cook. It is a weird looking sea creature. A slimy, pale mass with a lump of a body and sprawling arms dotted with suckers. In its legendary, mythical proportions of the Kraken, the octopus becomes a sea monster. A magnificent beast of the sea. Lying there on my kitchen counter, I felt sorry for it. I could see it floating freely in the sea waters. Now, it was about to be cooked and eaten. I picked it up. It wobbled in my hand like a giant jelly pudding, and I felt its suction-cupped arms sliding down my hands and wrists. I took a deep breath, trying not to shudder, and put it into a stock pot to simmer slowly. The kitchen filled with the sweet salty aromas of soft boiling seafood. 


Octopus is a wonderfully delicious meat. It is tender and naturally full of flavor. The same as cuttlefish or squid, octopus shrinks substantially when cooked (a kilo of raw octopus yields around 350 gr of cooked meat). The octopus also changes color: from a dull greyish pink to deep shades of red and hues of orange brown. I tried out three ways to prepare the octopus: a quick boil and then grill, a slow, gentle simmer, and finally stewing it.

The recipes below draw on the aromatic, savory flavors of the octopus. The first one combines it grilled with the sweetness of roasted peppers and herbal freshness of young salad leaves. In the second recipe, super tender octopus is mixed with vegetables that were blanched in the same stock. In the last one, all of the octopus' natural flavors turn a simple tomato sauce into to a fragrant, richly flavored stew.

grilled octopus and roasted peppers

Grilled Octopus with Roasted Peppers, Purslane & Red Orach
(appetizer/recipe for 4)

  • 1 kg octopus, cleaned and tenderised
  • 1 of each red, yellow, and orange peppers (roasted, peeled and seeds taken out)
  • handful each of purslane and orach leaves*
  • a pinch dried chili flakes
  • 1 tsp grated orange peel
  • 1 tbsp olive oil
  • juice of 1/2 lemon
  • 1-2 crushed garlic cloves
  • salt flakes
Bring lightly salted water to a boil, add the octopus whole and boil for about 15 minutes. Cool and cut the arms and body into (still large) pieces. Toss in olive oil and lemon juice (don't use all as you need some of it for the roasted peppers). Add crushed garlic. Leave to marinade for 30 minutes to an hour. Skewer the pieces (it makes it easier to handle on the barbecue). Grill on a medium hot barbecue for about 10 minutes, turning every now and then. 

Cut the roasted peppers in strips, add the orange peel and the chili flakes. Toss with the remaining olive oil and lemon juice. Season (to taste) with the salt flakes. Cut the grilled octopus in smaller pieces. Scatter the young salad leaves on a plate. Arrange the roasted peppers on top and add the pieces of grilled octopus.

*Purslane's light-green small leaves have a refreshing, almost salty taste. The red orach's vibrant colored leaves have the earthy taste of wild spinach. As salad leaves, it is a nice balance with the sweet roasted capsicum and tender grilled octopus. Any similar or other young salad leaf will do.


Salad of Octopus, Fennel, Potato, Celeri & Kalamata Olives
(appetizer/recipe for 4)
octopus salad served with (homemade) taramosalata

  • 1 kg octopus, cleaned and tenderized
  • 1 cup vegetable stock
  • 1 cup each of small diced fennel, potato, celeri
  • 1 cup pitted and chopped kalamata olives
  • 1 cup finely chopped parsley
  • 1 tbsp olive oil
  • salt flakes

Slowly simmer the octopus whole in a basic stock. It may seem like a very little amount of stock, but the octopus will add to it: a lot of liquid comes out of the octopus as you cook it. Take it out after about an hour to test the tenderness. If you are happy with it, proceed. If still not tender enough, simmer longer. My octopus was super tender after an hour. I guess the fisherman who caught it, tenderised it well. Let cool and when cool enough to handle, cut in bite size chunks.

In the meantime, bring 2 cups of the octopus stock to a boil, and cook the potatoes soft but with a bite, then quickly blanch (about 1 minute) the celeri and fennel in the same boiling stock.  Add all the vegetables to the octopus, and mix in the parsley and kalamata olives. Add the olive oil and a squirt of lemon juice, season to taste with the salt flakes. This salad is perfect to serve lukewarm, or at room temperature.

Tomato-based Octopus Stew
(main course/recipe for 4)
  • 1 kg octopus, cleaned and tenderized, cut into smaller pieces
  • 1 cup peeled and diced tomatoes, pureed (canned is fine)
  • 1 medium onion, diced fine
  • 1 tbsp olive oil
  • 4-5 cloves of garlic, crushed
  • pinch of dried chili flakes
  • salt/black pepper to taste
Heat the olive oil and fry the onions over medium heat softly until they glaze. Add the octopus pieces and stir-fry over medium heat for 3-5 minutes. Add the chili flakes, garlic and fry for another minute or so on medium heat. Cover and let it cook over low heat for about 15 minutes (you will see a reddish liquid coming from the octopus: it is your natural seafood stock). Add the pureed tomatoes and bring all to a boil. Gently simmer in the tomato sauce for about 45 minutes, or until the octopus is tender. If you don't want your sauce to be too liquid, leave the lid either half-on or completely off. Keep an eye on it, in case too much liquid evaporates. Finish with some fine chopped parsley or basil. Season to taste.


Sunday, April 29, 2012

Sea Scallop Mouclade


Whenever I am "home" in the Laurentians in Quebec, giant sea scallops are on the menu at least once a week, or so I would like. Tender and juicy, each is easily the size of a child's fist. These magnificently big scallops are simply the best pan-grilled until browned and crispy outside, yet inside still rare and full of the flavors of the sea. I know you can get them elsewhere in the world. Somehow though, so close to where they were harvested, they taste even better. Relatively close, that is. The Laurentians are still a good 1000 km away, as the crow flies. In Canada, these giant sea scallops are found (and cultured) in the Atlantic regions of Nova Scotia, Newfoundland, and the north part of the Gulf of Saint Lawrence.

In this recipe, the tender scallop gets to mingle with a creamy mussel "mouclade" fragrant with fennel and fresh thyme. Mouclade is a classic French mussel dish from the Poitou-Charentes region on the Atlantic Coast north of Bordeaux in France. The mussels are cooked in white wine, and served (typically on the half shell) in a creamy sauce. In the photograph, the dish is finished with a pinch of espelette. A little further south down the French Atlantic coast, espelette is a dried red pepper from the Basque region. Named after the town of Espelette in the Pays Basque, this fragrant and mild red pepper is traditionally used in making Bayonne ham. 

(recipe is for 2)
2 large king scallop
1 cup steamed mussels, taken from their shells
1/2 cup of the mussel cooking liquid*
splash white wine
1/4 cup double cream
quarter bulb fennel, diced
a sprig of fresh thyme
1 shallot, diced
1 clove of garlic, crushed and chopped fine
a pinch of espelette (optional)
1 tbsp unsalted butter

melt the butter until it starts to foam. Add the shallots and fennel and saute over low-heat until soft (takes about 5 minutes). Add the white wine and cook out. Add the mussel cooking liquid and reduce to half. Add the double cream and simmer until all flavors have infused. Finish to taste. When ready to serve, add the cooked mussels and warm through in the sauce (do not simmer or keep in sauce too long: the mussels will get tough). In the meantime, sprinkle salt flakes on top of the scallop, heat butter until starting to brown and sear the scallop quickly on both sides to brown. Place the hot, seared scallop on top of the mussels in the cream sauce and serve immediately.

*make a basic stock of 1 cup water + 1 cup dry white wine, and 1 cup mixed cut vegetables (leek, carrot, celeri, onion, garlic, fennel), add a sprig of fresh thyme and a bayleaf and salt/pepper to taste. Bring to a boil in a large stockpot. When boiling, add the cleaned mussels in one go and close the lid. Steam until the mussels open and the flesh is soft yet firm.